WP Optimisation
web.dev/learn/
developers.google.com/web/fundamentals
Improve Largest Contentful Paint (LCP) With A JS + CSS Trick
www.pdms.ca/improve-largest-contentful-paint-lcp-with-a-js-css-trick/
Testing Tools +
Google PageSpeed Insights
pingdom.com/free
tools.pingdom.com
wpengine.com/speed-tool/
Remove outdated content
Query Monitor By John Blackbourn
Query Monitor is the developer tools panel for WordPress. It enables debugging of database queries, PHP errors, hooks and actions, block editor blocks, enqueued scripts and stylesheets, HTTP API calls, and more.
giftofspeed.com
webpagetest.org
whichloadsfaster.zomdir.com
seowebpageanalyzer.com/
dotcom-tools.com/website-speed-test.aspx
WP Optimization Plugins +
wordpress.org/plugins/wps-hide-login
wordpress.org/plugins/wps-cleaner
wordpress.org/plugins/litespeed-cache
wordpress.org/plugins/yith-infinite-scrolling
wordpress.org/plugins/flying-pages/
wordpress.org/plugins/varnish-http-purge/
wordpress.org/plugins/wp-asset-clean-up/
wordpress.org/plugins/page-optimize/
https://flying-press.com
Some Definitions +
First Contentful Paint(FCP)
The number of seconds from the time the navigation started until the page's primary content appears on the screen.
gtmetrix.com/blog/first-contentful-paint-explained/
web.dev/fcp/
First Meaningful Paint (FMP)
When a website’s contents are fully loaded that users are looking for, that is called First Meaningful Paint. This is the time at which the user feels that the primary content of the page is visible. As the name suggests after the first meaningful paint render, it giver meaningful information to the users.
Speed Index
First Contentful Paint (FCP) and First Meaningful Paint (FMP) Explained
www.acmethemes.com/blog/first-contentful-paint-and-first-meaningful-paint
Time to Interactive
The number of seconds from the time the navigation started until the CPU had at least 5 seconds of quiescence. This metric comes from Lighthouse as is only available in mobile tests
First CPU Idle
The number of seconds from the time the navigation started until the page is minimally interactive. This metric comes from Lighthouse as is only available in mobile tests
Largest Contentful Paint (LCP)
Largest Contentful Paint (LCP) is a Core Web Vitals metric and measures when the largest content element in the viewport becomes visible. It can be used to determine when the main content of the page has finished rendering on the screen.
DOMContentLoaded
The number of seconds from the time the navigation started until the initial HTML document has been completely loaded and parsed.
onLoad
The number of seconds from the time the navigation started until the document and all of its dependent resources have finished loading
Critical Rendering Path
Work List of WP Optimization +
Web Hosting+
One of the very first things you should do when hosting your WordPress site is to determine where the majority of your visitors or customers are coming from. Why is this important? Because the location at which you host your website plays a significant factor in determining your overall network latency and TTFB. It also impacts your SFTP speeds and WordPress admin dashboard responsiveness.
Network Latency: This refers to the time and or delay that is involved in the transmission of data over a network. In other words, how long it takes for a packet of data to go from one point to another. Nowadays this is typically measured in milliseconds; however, it could be seconds depending upon the network. The closer to zero the better.
TTFB: This stands for time to first byte. To put it simply, this is a measurement of how long the browser has to wait before receiving its first byte of data from the server. The longer it takes to get that data, the longer it takes to display your page. Again, the closer to zero the better.
you need to know is that you want your network latency and TTFB to be as low as possible. One of the easiest ways to accomplish this is to choose a server closest to your visitors. You can determine the best location by following the tips below.
- Check the Geolocation of Your Visitors in Google Analytics
- Do a Quick Latency Test
Shared Hosting Vs Cloud Hosting Vs VPS Vs Dedicated Hosting
www.hostgator.com/cloud-hosting
tmdhosting.com/cloud-hosting
PHP 7 or Higher for the Best Performance
PHP is an open-source, server-side scripting and programming language that’s primarily used for web development. The bulk of the core WordPress software is written in PHP, along with your plugins and themes, which makes PHP a very important language for the WordPress community. You should ensure your WordPress host offers at least PHP 7 or higher.
There are different versions of PHP that your host will provide you on your server, with the newer PHP 7.3 offering huge performance improvements.
if you compare PHP 7.3 to PHP 5.6, it can handle 3x as many requests (transactions) per second! PHP 7.3 is also on average 9% faster than PHP 7.2. This can also impact your WordPress admin dashboard responsiveness.
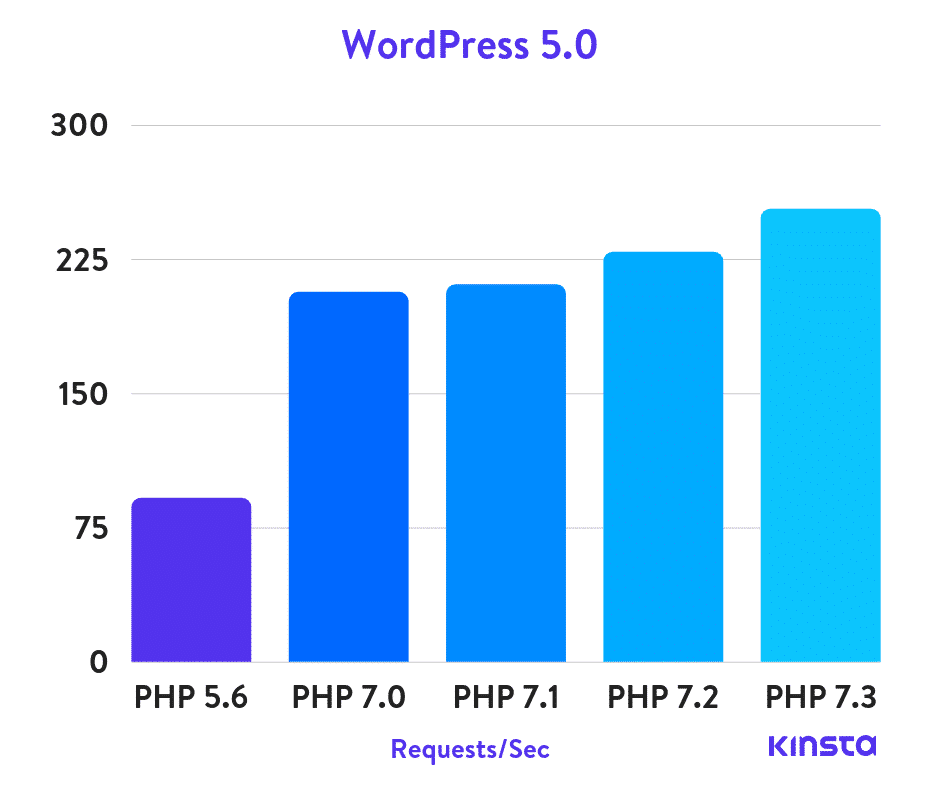
WordPress 5.0 PHP benchmarks
Pick a Host That Uses NGINX
Behind the scenes, every WordPress host uses a web server to power your WordPress sites. The most common choices are NGINX and Apache.
We strongly recommend going with a host that uses NGINX because of its roots in performance optimization under scale. NGINX often outperforms other popular web servers in benchmark tests, especially in situations with static content or high concurrent requests, which is why Kinsta uses NGINX.
Faster speeds plus improved security, is why Kinsta always offers the most recent versions of PHP. You can change PHP versions with a single click.
Your Host’s Network Matters
When choosing a WordPress host you might not even think to ask or research into what network they’re using, but you should. The network can have a huge impact on your site’s performance and even the snappiness of your WordPress dashboard. Many hosts will leave this out of their marketing as they’ll opt for the cheapest network to cut costs.
Minimize HTTP Requests +
Whenever someone lands on your site, their web browser “requests” (short for HTTP request) a list of files that are needed to “build” the page in your visitor’s browser. These requests include HTML, CSS, images, etc. And they even include external files and scripts, like your Google Analytics tracking code.
You saw an example of all these requests in the waterfall above (when you learned how to suss out slow plugins).
While each request can take different amounts of time, a good general rule is that more HTTP requests equals a slower website.
This is why tools like Pingdom and GTmetrix put the number of requests at your site front and center:

While some of the stuff that we’ve discussed – like using Autoptimize for concatenation – will help you reduce the number of requests at your WordPress site, you can also take things further with a more manual approach.
I don’t want to get too deep here because a full discussion takes a post of its own. But some quick wins for most WordPress sites are:
- Not using Google Fonts
- Disabling Font Awesome
- Turning off Gravatars
For example, to turn off Google Fonts and Font Awesome in your Elementor designs, you can add these two code snippets to a plugin like Code Snippets or your child theme:
add_filter( 'elementor/frontend/print_google_fonts', '__return_false' );
add_action( 'wp_enqueue_scripts', function() { wp_dequeue_style( 'font-awesome' ); }, 50 );
80% of the end-user response time is spent on the front-end. Most of this time is tied up in downloading all the components in the page: images, stylesheets, scripts, Flash, etc. Reducing the number of components in turn reduces the number of HTTP requests required to render the page. This is the key to faster pages.
One way to reduce the number of components in the page is to simplify the page's design. But is there a way to build pages with richer content while also achieving fast response times? Here are some techniques for reducing the number of HTTP requests, while still supporting rich page designs.
Combined files are a way to reduce the number of HTTP requests by combining all scripts into a single script, and similarly combining all CSS into a single stylesheet. Combining files is more challenging when the scripts and stylesheets vary from page to page, but making this part of your release process improves response times.
CSS Sprites are the preferred method for reducing the number of image requests. Combine your background images into a single image and use the CSS background-image and background-position properties to display the desired image segment.
Image maps combine multiple images into a single image. The overall size is about the same, but reducing the number of HTTP requests speeds up the page. Image maps only work if the images are contiguous in the page, such as a navigation bar. Defining the coordinates of image maps can be tedious and error prone. Using image maps for navigation is not accessible too, so it's not recommended.
Inline images use the data: URL scheme to embed the image data in the actual page. This can increase the size of your HTML document. Combining inline images into your (cached) stylesheets is a way to reduce HTTP requests and avoid increasing the size of your pages. Inline images are not yet supported across all major browsers.
Reducing the number of HTTP requests in your page is the place to start. This is the most important guideline for improving performance for first time visitors. As described in Tenni Theurer's blog post Browser Cache Usage - Exposed!, 40-60% of daily visitors to your site come in with an empty cache. Making your page fast for these first time visitors is key to a better user experience.
Use a CDN +
There are two different types of content delivery networks:
- Traditional Pull CDN
- Reverse Proxy CDN
Traditional pull CDNs cache a copy of all of your content and media, but a request from the client is still made directly to your hosting provider. KeyCDN and CDN77 are examples of traditional CDNs.
A reverse proxy CDN is slightly different. While it still acts likes a CDN, it intercepts all incoming requests and acts as an intermediary server between the client and your host. Cloudflare and Sucuri are examples of reverse proxy CDNs. This is one reason why you have to point your DNS directly to these providers instead of your host.
Additional CDN Optimizations
Here are a few additional CDN optimizations you might want to check out or think about.
- If you have a lot of comments, gravatars can generate a lot of requests. They load from secure.gravatar.com. Check out this tutorial on how to load gravatars from your CDN instead. We do this on the Kinsta website. 👍
- You can host your custom web fonts from your CDN or even Google fonts on your CDN. Check out our in-depth tutorial on local fonts.
- Make sure to load your favicon from your CDN. Even though it’s small, every request counts!
Pros:
1. Different domains
Browsers limit the number of concurrent connections (file downloads) to a single domain. Most permit four active connections so the fifth download is blocked until one of the previous files has been fully retrieved. You can often see this limit in action when downloading many large files from the same site.
CDN files are hosted on a different domain. In effect, a single CDN permits the browser to download a further four files at the same time.
2. Files may be pre-cached
jQuery is ubiquitous on the web. There’s a high probability that someone visiting your pages has already visited a site using the Google CDN. Therefore, the file has already been cached by your browser and won’t need to be downloaded again.
3. High-capacity infrastructures
You may have great hosting but I bet it doesn’t have the capacity or scalability offered by Google, Microsoft or Yahoo. The better CDNs offer higher availability, lower network latency and lower packet loss.
4. Distributed data centers
If your main web server is based in Dallas, users from Europe or Asia must make a number of trans-continental electronic hops when they access your files. Many CDNs provide localized data centers which are closer to the user and result in faster downloads.
5. Built-in version control
It’s usually possible to link to a specific version of a CSS file or JavaScript library. You can often request the “latest” version if required.
6. Usage analytics
Many commercial CDNs provide file usage reports since they generally charge per byte. Those reports can supplement your own website analytics and, in some cases, may offer a better impression of video views and downloads.
7. Boosts performance and saves money
A CDN can distribute the load, save bandwidth, boost performance and reduce your existing hosting costs — often for free.
Cons:
1. Additional complexity
A link to a CDN file won’t work if you’re developing offline. That’s rarely an issue, but some developers have temperamental internet connections or need to work on the move.
You also likely to require a build process or manual intervention when deploying your site to a live server. It will be necessary to CDN-ize local links to JavaScript libraries and other assets. It could become complicated if you’re using a service such as Amazon S3 to host some resources but not others.
2. Files may not be optimized
Consider a modular library such as Modernizr or YUI. Free CDN-hosted files are available but they generally provide all the common functionality within a large package that may exceed several hundred Kb.
If you just require a few features, you can use your own specialized versions and merge all CSS and JavaScript files to invoke fewer HTTP requests. The result is smaller files which download quicker and execute faster — especially on mobile devices.
That said, you could upload optimized files to a private CDN but you would need to consider the additional effort and cost that would incur.
3. There are no pre-caching guarantees
While there’s a higher probability a popular CDN file has been pre-cached, it’s not a given. In particular, mobile devices tend to have small and fairly inefficient caches. The advantages may be negligible, especially if you can host a smaller file on your local server.
4. Blocked access
We live in a world with geographic, legal, political, and commercial boundaries. It’s not uncommon for organizations or whole countries to block the domains or IP address of popular free CDN services.
Similarly, companies such as Google and Microsoft must adhere with US export laws. There are known restrictions on use of data in Cuba, Iran, North Korea, Sudan and Syria. The list of blocked countries can change on the whim of any government.
5. Two points of failure
It’s catastrophic when your site goes down and, despite a good reliability record, CDNs aren’t infallible. There’s little you can do but wait for the service to resume.
It would be possible to use a CDN and fall-back to local files if the service isn’t available. It’s a solution which provides a good level of redundancy — at the expense of further development and complexity.
6. Security
If security is a major concern, don’t use a public CDN. When a remote file is called, information about the referrer is also sent. Remotely-hosted JavaScript libraries are particularly risky since the code could be modified to collect data about your users or systems.
Similarly, your CDN options will be more limited if you require HTTPS.
7. Loss of control
Are you happy handing control of website files to Google, Microsoft, Amazon or any other large web company? Are you concerned they’re collating information about your website and systems? Do those companies have too much control over the net? Perhaps it’s paranoia, but you have a reason to be paranoid when everyone’s out to exploit you!
developer.wordpress.com/docs/photon/
Photon is an image acceleration and modification service for Jetpack-connected WordPress sites. Converted images are cached automatically and served from the WordPress.com CDN. Images can be cropped, resized, and filtered by using a simple API controlled by GET query arguments.
statically.io/wordpress
Minimize CSS and javascript, optimize and add transformation capabilities to images, cache and deliver quickly.
Cloudflare
What is CloudFlare ? | How To Convert HTTP websites into HTTPS for FREE | Configure CloudFlare CDN - by Sid Talk
how you can create account in cloudflare & how CloudFlare can help you to get Free SSL certificate to convert your HTTP website into HTTPS free of cost. CloudFlare can also help you to provide global CDN (Content Delivery Network) for free
How To Setup CloudFlare to Your Website 2019 - by BM Tech Tips
How to Use Cloudflare to Improve the Speed & Security of WordPress Websites - Cloudflare 2018
Video Tuts of Cloudflare and W3Total Cache by Nayyar Shaikh
Must Use Page Rules for Everyone - by Cloudflare
Enable Dynamic Caching +
Adding Dynamic caching to your WordPress site will have great effect on its speed. There are many services like Varnish and APC that can be used but all of them require a lot of server configuration and tweaking of your application to work correctly. This is why, we at SiteGround have created a tool called the SuperCacher. With it, all you need to do is install a small plugin and enable the Dynamic caching with a single click. For more information on how to use it, please check out siteground SuperCacher Tutorial.
- Page cache: it happens on the server and stores the entire HTML of a page (as WP Rocket does);
- Browser cache: it keeps storing the HTML but occurs on the browser;
- Object cache: it stores database queries;
- Bytecode cache: it’s a PHP extension and stores precompiled script bytecode in the memory;
- CDN cache: it occurs on the CDN-side and stores the HTML and all other static files (images, CSS and JS);
- Reverse proxy cache: it happens on the server’s side and stores all its responses to the client’s server.
wp-rocket.me (Premium Only)
W3 Total Cache By Frederick Townes
WP Super Cache By Automattic
WP Fastest Cache By Emre Vona
Cache Enabler - WordPress Cache By KeyCDN
LiteSpeed Cache By LiteSpeed Technologies(For Litespeed servers only)
WP-Optimize – Clean, Compress, Cache. By David Anderson, Ruhani Rabin, Team Updraft
Autoptimize By Frank Goossens (futtta)
Hummingbird � Speed Optimize, Cache, Minify & Defer Critical CSS/Javascript
Asset Cleanup Pro
wordpress.org/plugins/nitropack/
perfmatters.io
nitropack.io
Server Side Caching / reverse proxy cache +
Introduction to Varnish
Proxy Cache Purge By Mika Epstein
This plugin does not install nor configure a cache proxy. It acts as an interface with such services.
HTTPS is faster than HTTP +
If you are using web browser that supports HTTP/2 I guarantee you can see HTTPS is way faster than HTTP. The difference increases when you refresh that page because of the session resumption feature of HTTP/2. There is also a benchmark on the official Go website: https://http2.golang.org/gophertiles. In this page, you might see a different kind of test. Like the first one, you can see HTTPS is way faster as well. Right, these tests in real are not about HTTP vs HTTPS, it is HTTP/1.1 vs HTTP/2. However, please be reminded that on every web browser, HTTP/2 is ONLY supported on the top of SSL/TLS.
HTTPS is faster than HTTP- Article by Snowball.digital
HTTP/2 - SiteGround
Let’s Encrypt - SiteGround
Image Optimisation +
Images are essential part of every website. It is important to have them optimized. There are few things regarding your images that you should have in mind when developing your WordPress site:
- Use images with the proper size. Do not upload big images and then scale them with HTML. Make sure that your photos and other images are not bigger than the size you're actually displaying them in.
- If possible, use Sprites for your themes. Using sprites is a CSS technique that uses a single image to show multiple design elements on your pages. This way instead of loading dozens of small images (making http requests each time), your site will open a single one. Sprites, however, must be considered when the theme is designed. So always look for themes that utilize sprites.
tinypng.com - Image Optimization
tinyjpg.com - Image Optimization
Imagify – WebP & Image Compression and Optimization - by WP Media
Smush Image Optimization, Compression, and Lazy Load By WPMU DEV
EWWW Image Optimizer By Exactly WWW
Image optimization & Lazy Load by Optimole By Optimole
ShortPixel Image Optimizer By ShortPixel
shortpixel.com/pricing-one-time
wordpress.org/plugins/shortpixel-adaptive-images/
Shortpixel Image Optimizer vs Shortpixel Adaptive Images
Video Tuts by WPLearningLab - Dec 17, 2019
Media Cleaner +
wordpress.org/plugins/media-cleaner/
Media Cleaner cleans your Media Library from the media entries (and files) which aren�t used in your website, as well as broken entries. An internal trash allows you to make sure everything works properly before deleting the media entries (and files) permanently. It uses a smart analysis powered by many implementations for specific plugins and themes.
wordpress.org/plugins/wps-cleaner/
The WPS Cleaner plugin allows you to clean up: posts, comments, terms, options, extensions, themes, media and files. Each with their own tab and cleaning options.
remove-unused-image-media-sizes-wordpress-theme/
An Article by wpbeaches.com
Image Lazy Load +
Lazy loading images means loading images on websites asynchronously � that is, after the above-the-fold content is fully loaded, or even conditionally, only when they appear in the browser's viewport. This means that if users don't scroll all the way down, images placed at the bottom of the page won't even be loaded
wordpress.org/plugins/a3-lazy-load/
Five Techniques to Lazy Load Images for Website Performance
by Sitepoint
github.com/verlok/vanilla-lazyload
Video Lazy Load +
wordpress.org/plugins/a3-lazy-load/
web.dev/lazy-loading-video/
www.cssscript.com/lazy-load-youtube-video-llyv/
Ensure text remains visible during webfont load +
Ensure text remains visible during webfont load
web.dev/font-display/
Preload web fonts to improve loading speed
https://web.dev/codelab-preload-web-fonts/
Learn how to improve render times with critical CSS technique +
Remove render-blocking JavaScript +
web.dev/render-blocking-resources/
Browsers have to build a DOM tree by parsing HTML before they can render a page. If your browser encounters a script during this process, it has to stop and execute it before it can continue.
Google suggests avoiding and minimizing the use of blocking JavaScript.
Defer Parsing Javascript +
How to Defer Parsing of JavaScript in WordPress
An article by hostinger.co.uk
wordpress.org/plugins/async-javascript/
wordpress.org/plugins/flying-scripts/
Paste the code in functions.php
  function defer_parsing_of_js( $url ) {
  if ( is_user_logged_in() ) return $url; //don't break WP Admin
  if ( FALSE === strpos( $url, '.js' ) ) return $url;
  if ( strpos( $url, 'jquery.js' ) ) return $url;
  return str_replace( ' src', ' defer src', $url );
  }
  add_filter( 'script_loader_tag', 'defer_parsing_of_js', 10 );
Minify and combine your JavaScript and CSS files +
Minification and combination are two techniques with one purpose - to reduce the size and number of JavaScript and CSS files that your site loads. Minification strips all unnecessary symbols by removing precious bites from being loaded every time you request an URL.
Combination on the other hand, combines multiple JavaScript and CSS files into one. This reduces the number of requests your site makes. There are a few plugins that do this really well. Either WP Rocket, a premium option or WP Super Minify, a good free plugin, can do the job.
cssminifier.com
developers.google.com/closure/compiler
www.crockford.com/jsmin
jscompress.com
Remove unused JavaScript & CSS +
Remove unused JavaScript
Find Unused JavaScript And CSS Code With The Coverage Tab In Chrome DevTools
How to remove unused CSS & JS | Increase website speed 2x
Video Tuts by Technical Academy - June 21, 2020
wordpress.org/plugins/wp-asset-clean-up/
How to Remove CSS From Your Wordpress Website - Removing Emoji CSS from WordPress
Video Tuts by Joshua Herbison - Nov 4, 2019
keycdn.com/blog/remove-unused-css
purifycss.online/
Remove render-blocking CSS +
Eliminate render-blocking resources+
Remove unused code +
Code-Splitting +
The concept of Code-splitting is to split the code into separate bundles, and dynamically load them only when you need it.
There are a few ways you can look at code splitting, you can: split code based on URL routes, so you don’t have to load the code for page 2 on Page 1. Or you can split the large code style.css into multiple files and inject the required files into the respective pages.
Splitting files seems easy, but figuring out which page uses which elements is extremely difficult in WordPress. It’s because all other plugins or custom HTML elements might be using them.
+
+
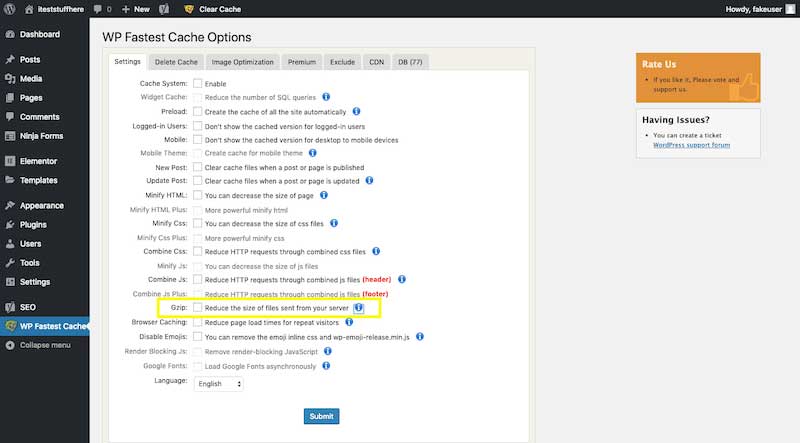
Enable gZIP compression +
To decrease the size of data that's being transferred between your server and your visitors, you can enable the gZIP compression for your images, CSS and JavaScript files. By doing this, the web server will compress (like creating a ZIP file for example) this content before it's transferred over the Internet to your browser. On the other side, the browser decompresses the content before rendering it. This significantly lowers the size of information that's being transferred lowering the loading times of your website's pages.
The easiest way to enable the gZIP compression for your images, CSS and JS files is to add these lines to your .htaccess file in the root WordPress folder:
## ENABLE GZIP COMPRESSION ##
<IfModule mod_deflate.c>
AddOutputFilterByType DEFLATE text/plain
AddOutputFilterByType DEFLATE text/html
AddOutputFilterByType DEFLATE text/xml
AddOutputFilterByType DEFLATE text/css
AddOutputFilterByType DEFLATE application/xml
AddOutputFilterByType DEFLATE application/xhtml+xml
AddOutputFilterByType DEFLATE application/rss+xml
AddOutputFilterByType DEFLATE application/javascript
AddOutputFilterByType DEFLATE application/x-javascript
</IfModule>
## ENABLE GZIP COMPRESSION ##
From Plugin example:
Leverage browser caching +
Leveraging the browser caching means that you can specify for how long your visitors' browsers should cache your images, CSS, JS and flash files. However, if any of those resources is cached, your server will notify the visitor's browser and the cached content will be replaced with the new one. You can add the following lines to the .htaccess file of your WordPress in order to enable this technique.
  ## LEVERAGE BROWSER CACHING ##
<IfModule mod_expires.c>
ExpiresActive On
ExpiresByType image/jpg "access 1 year"
ExpiresByType image/jpeg "access 1 year"
ExpiresByType image/gif "access 1 year"
ExpiresByType image/png "access 1 year"
ExpiresByType text/css "access 1 month"
ExpiresByType application/pdf "access 1 month"
ExpiresByType application/x-javascript "access 1 month"
ExpiresByType application/javascript "access 1 month"
ExpiresByType application/x-shockwave-flash "access 1 month"
ExpiresByType image/x-icon "access 1 year"
ExpiresDefault "access 2 days"
</IfModule>
## LEVERAGE BROWSER CACHING ##
<filesMatch ".(ico|pdf|flv|jpg|jpeg|png|gif|js|css|swf)$">
Header set Cache-Control "max-age=84600, public"
How to Add mod_expires to your .htaccess
Leverage Browser Caching In WordPress
Leverage Browser Caching for 3rd Party JavaScript
PageSpeed Insights 99/100 because of Google Analytics - How can I cache GA?
Avoid a Character Set in the Meta Tag +
Videos and Audio Files +
Video and audio assets tend to be much heavier than images. Although your website might not use as many of them, they can still cause serious issues for your site speed if you don’t add them to a page wisely.
Unlike images that can be uploaded as media, all video and audio files should be stored on an external drive.
One of the most common ways to do this is to upload videos to YouTube or Vimeo and them embed with a shortcode on the page. This way, when the page loads, your server doesn’t have to worry about pulling that video asset up. The video storage service does all of the work.
With drag-and-drop builders — including WordPress’s new Gutenberg editor — all you have to do is add a block for video or audio and then provide a link:

Offload Media and Email When Needed +
Everything that generates a request has an impact on your site’s performance in one way or another. For sites with hosting hundreds of thousands of files or large media, it may be wise offload this completely. Offloading is different than serving it up via a CDN. With a CDN the original data still resides at your host, the CDN simply has multiple copies of it.
When caching expires on your CDN assets it re-queries your host for the latest copies of the files. CDNs are meant to cache files for long periods of time. But due to the fact that they have so many POPs, there could be a lot of re-querying going on as cache expires in different regions.
When you offload media or files it means actually moving the original physical location of them off of your hosting provider. So while it might appear that the files are served from your site, they are really located somewhere else entirely. Besides reducing additional queries back to the host, the number one reason obviously is to also save on disk space.
- Offload Media to Amazon S3
- Offload Media to Google Cloud Storage
Hotlinks +
It’s always great when someone likes your site enough to link back to it. What’s not so great, though, is when they like your images so much that they decide to pull them directly from your server.
To clarify, this doesn’t mean someone right-clicked an image from your site and saved it to their drive. Or that they took a screenshot. This means that they’re using a link to the image file on your server to load it on their own website. So, whenever someone views the web page where that hotlinked image lives, your server has to do the work of loading it; not theirs.
To prevent this from happening, disable hotlinks using your security plugin.
It’s easy to block hotlinking, just add this short code snippet to your site’s .htaccess file:
RewriteEngine on
RewriteCond %{HTTP_REFERER} !^$
RewriteCond %{HTTP_REFERER} !^http://(www\.)example.com/.*$ [NC]
RewriteRule \.(gif|jpg|jpeg|bmp|zip|rar|mp3|flv|swf|xml|php|png|css|pdf)$ - [F]
Post and Page Revisions +
Every time you hit the “Save” button on a page or post, it saves a copy of the old version on your server. You can override this setting and put a limit on how many revisions are saved, but it requires some coding in the wp-config.php file.
If you’re not comfortable doing this, you can use your database optimization plugin (WP-Optimize or WP-Sweep) to clean out excess revisions every couple of months.
Limit Revisions
Another good strategy is to limit the number of revisions that can be stored per post or page. Even setting it to something like ten will keep revisions from getting out of hand, especially if you do a lot of updating.
To limit revisions, you can add the following code to your wp-config.php file. The code below needs to be inserted above the ‘ABSPATH’ otherwise it won’t work. You can change the number to however many revisions you want to keep stored in your database.
define('WP_POST_REVISIONS', 10);
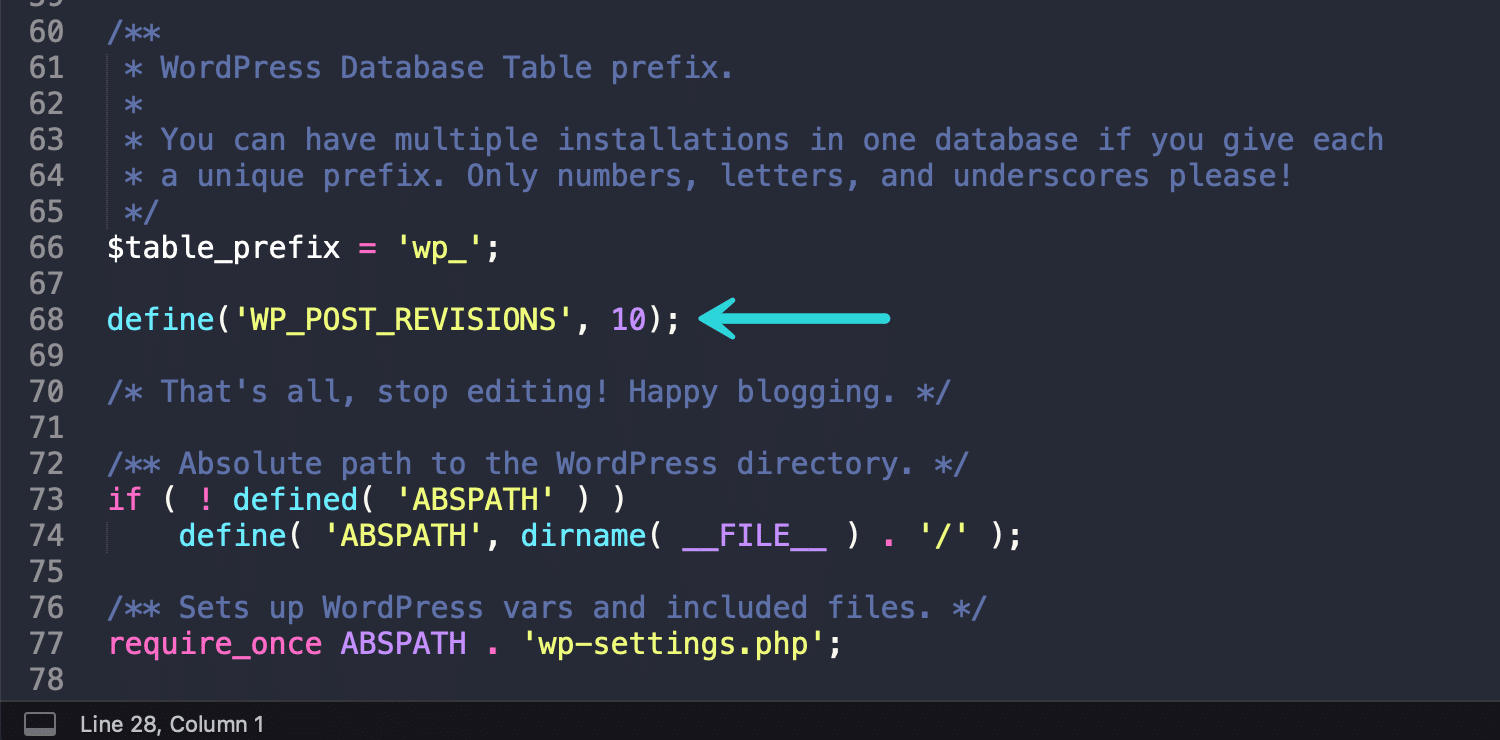
Limit post revisions in wp-config.php
Or you can utilize a plugin like Perfmatters to limit revisions.
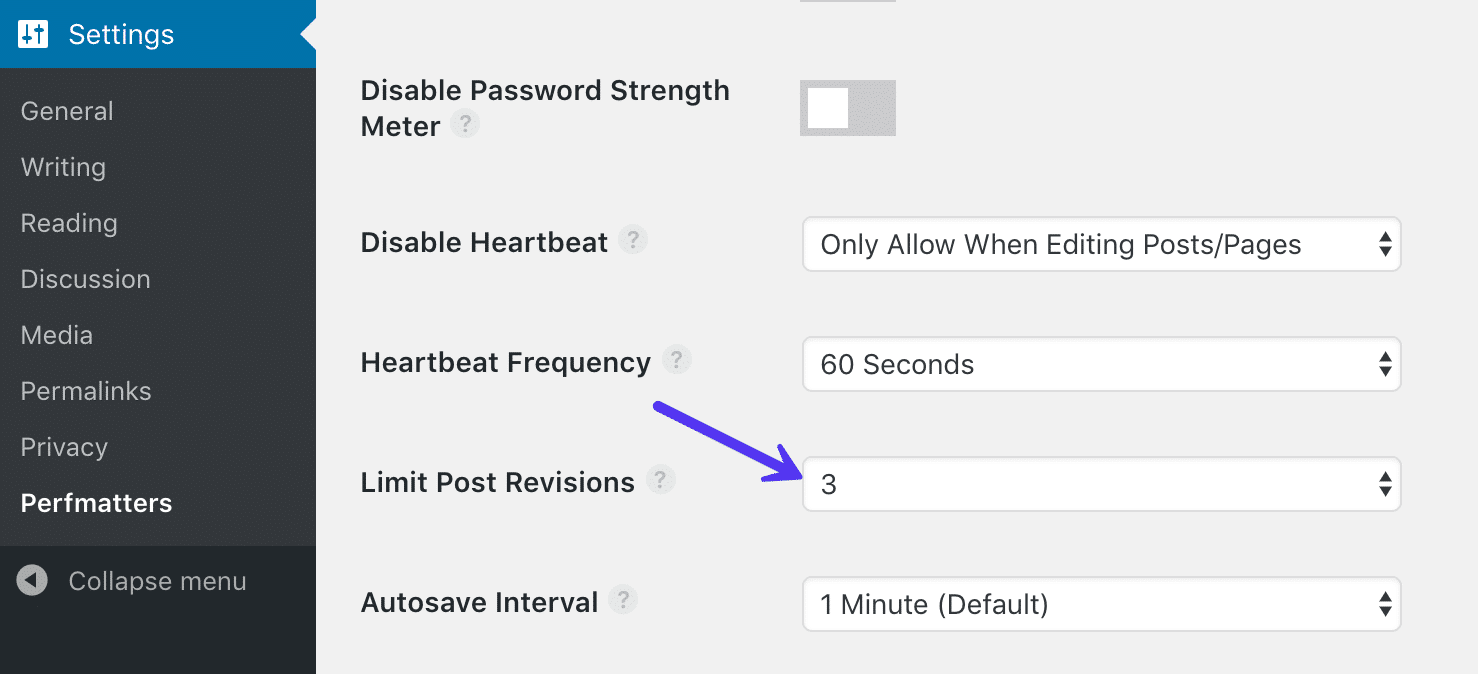
Limit post revisions with Perfmatters plugin
3. Disable Revisions
And last but not least, you can also disable revisions on your site altogether. If you’re going this route, we highly recommend following the first option above to delete revisions and then disabling them afterward. This way your database is completely free from all old revisions and no new ones will be added going forward.
To disable revisions, you can add the following code to your wp-config.php file. The code below needs to be inserted above the ‘ABSPATH’ otherwise it won’t work.
define('WP_POST_REVISIONS', false);
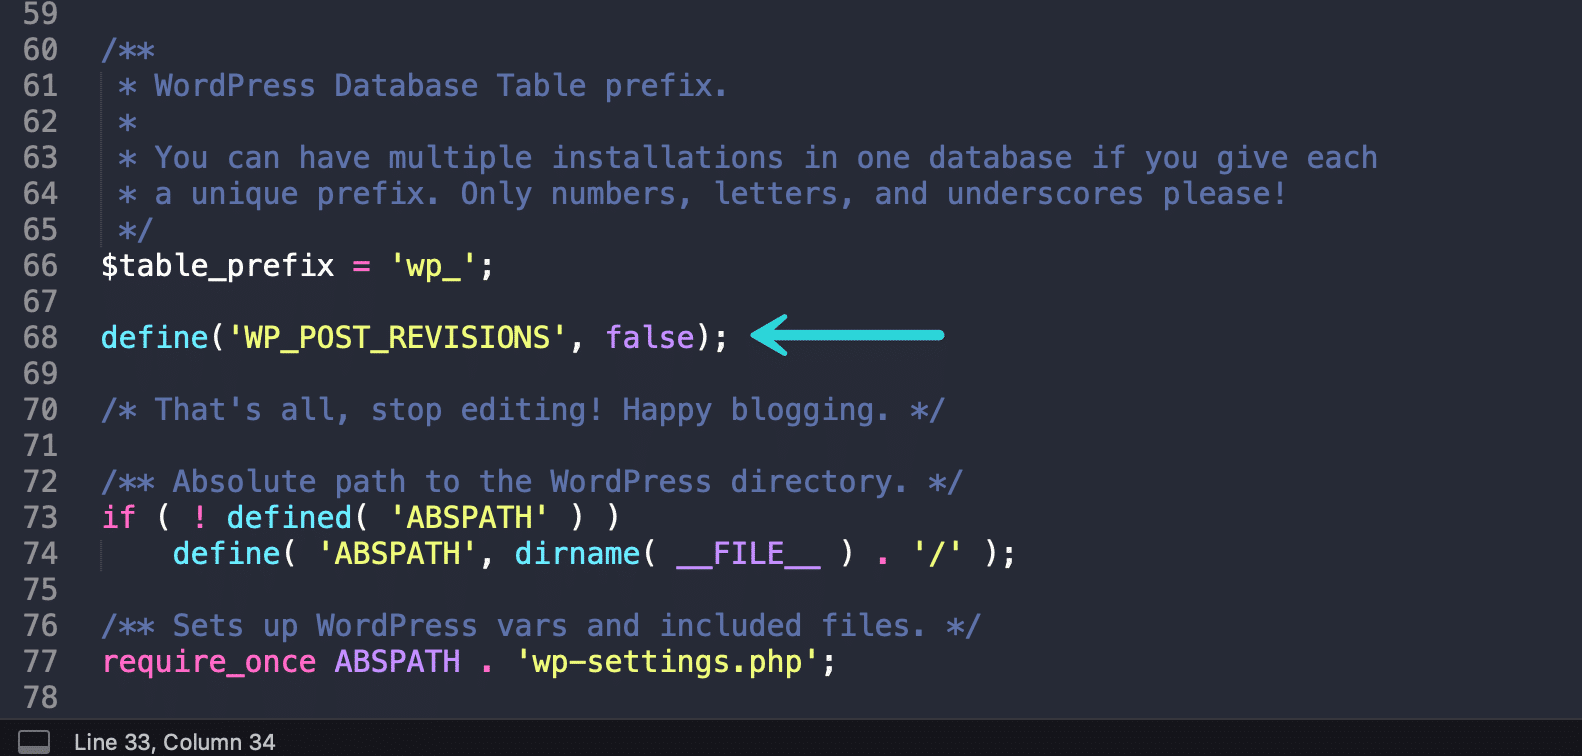
Disable post revisions in wp-config.php
Or you can utilize a plugin like Perfmatters to disable revisions.

Disable post revisions with Perfmatters plugin
Comments +
In general, comments in WordPress aren’t lengthy discourses. However, it’s not really the size of the comments that matters to performance. It’s the quantity of comments each of your posts receives.
Similar to how you use the Reading Settings to break up long post pages, you want to use the Discussion Settings to break up lengthy comments sections:

By default, WordPress will leave comment boards open for 14 days and store 50 comments on each page. That’s too much.
Update the timeframe to keep comment submissions under control — this will also encourage readers to comment on topics that are timely instead of ones that are old and out of circulation.
Reduce the total numbers of comments allowed per page to 10.
One last thing to do here is disable pingbacks and trackbacks. These are notifications you receive when someone shares a link to your blog on their website. They might seem necessary, but they just add more data to your server. Instead, set up a Google Alert if you want to stay on top of who’s mentioning your brand or website.
WordPress Updates +
With the hosting stuff out of the way, it’s time to look at what more you can do inside of WordPress to speed up your WordPress website.
The first place to start is by creating a system for managing your WordPress updates.

As you can see in the image above, your WordPress dashboard will let you know as soon as updates are available to:
- The WordPress core
- Installed plugins
- Installed themes
There’s a number of reasons a developer might push an update out for their WordPress software. It could be to fix a bug or security issue. It could be to add new features. Or it could be to improve performance problems. Either way, you want to have a process in place that ensures you stay on top of issuing these updates when they’re ready. WordPress will take care of the most critical security updates for you, but it’s your responsibility to handle all of the rest.
You have two options in this case.
The first is to manually make the update from your WordPress dashboard like so:

Or you can use a tool that automates the process for you. There are WordPress plugins like Easy Updates Manager that enable you to automate all updates.

Just be careful. While it may save you time from having to check on updates and do them yourself, there is a small possibility that a future update could prevent certain features from working or break your site entirely. If you can, it’s best to manage these on your own.
WordPress Theme +
The quality and size of WordPress themes can be problematic for WordPress, too. While WordPress does vet the quality of code before it allows a theme to show up in its repository, there’s a reason why plugins and themes are frequently updated.

Now, unless you’re a skilled coder or theme developer, it’s not likely that you’ll be able to poke around the theme to assess its quality. However, you can use two things to help you make this judgment.
The first is user reviews. They are available in the WordPress repository as well as in theme marketplaces like ThemeForest. Grab a handful of reviews and see if anyone has had problems with the theme slowing down their website. If so, find another one to use.
Also, look at what comes with the theme. For example, there are some premium themes that come jam-packed with templates, plugins, builder tools, and add-ons from third parties. If you don’t have a use for them, you shouldn’t install a theme package of that size on your server. It’s a waste of space and a drain on your resources. So, choose wisely.
Mobile-friendly Design +
If you go back to the speed testing tool, you’ll see that the same website will register different scores for desktop and mobile. That’s because mobile can’t handle websites the same way the bigger screens on desktops can.
As such, if you want to ensure that speeds are high across all devices, you’ll need to create a custom design strictly for mobile users. This means cutting down on nice-to-have-but-not-necessary design elements or sections (like pop-ups or ads), reducing the numbers of images used, and making pages shorter.
AJAX Cart Fragments +
There are a number of ways in which our plugins create extra work for the server. As already mentioned, plugins like analytics and social media make regular requests to external services which requires your server to work repeatedly to process those updates.
The same thing happens when you leave AJAX cart fragments enabled in WooCommerce.

When enabled, users immediately see their new item added to the cart icon in the corner of the site. While it’s a nice feature to have, e-commerce sites with lots of activity and sales are going to put their servers into overdrive if they leave them on.
Instead, turn off the AJAX cart fragments and enable the redirect option. This way, your shoppers won’t be confused if the new item doesn’t show up in the cart. They’ll be redirected to the cart page where they can see it for themselves.
User Data +
Whether your website gathers user data from e-commerce gateway, contact forms, reservation tools, or something else, it’s a good idea not to store that user data on your WordPress site and server.
This is true both for the performance side of things as well as the security piece. By keeping user data in a remote and secure location, you’ll conserve space on your server while also keeping it out of harm’s way if a hacker were to find their way inside your site.
Disable Pingbacks +
A pingback is an automated comment that gets created when another blog links to you. There can also be self-pingbacks which are created when you link to an article within your own blog.
We recommend simply disabling these as they generate worthless queries and additional spam on your site. Remember, the less calls your WordPress site has to make the better, especially on high-traffic sites. Not to mention the fact that a pingback on your own website is just downright annoying. Follow the steps below to disable pingbacks.
Step 1 – Disable Pingbacks From Other Blogs
In your WordPress dashboard, click into “Settings → Discussion.” Under the Discussion Settings section uncheck the option “Allow link notifications from other blogs (pingbacks and trackbacks) on new articles.”

Step 2 – Disable Self-Pingbacks
When it comes to disabling self-pingbacks you have a couple of options. You can use the free No Self Pings plugin. Or you can use a premium plugin like Perfmatters.

Disable self-pingbacks with Perfmatters
Alternatively, you could also disable self-pingbacks by adding the following code to your WordPress theme’s functions.php file. Warning, editing the source of a WordPress theme could break your site if not done correctly. Tip, you can easily add PHP snippets like this with the free Code Snippets plugin. This means you never have to touch your theme.
function wpsites_disable_self_pingbacks( &$links ) {
  foreach ( $links as $l => $link )
        if ( 0 === strpos( $link, get_option( 'home' ) ) )
            unset($links[$l]);
}

add_action( 'pre_ping', 'wpsites_disable_self_pingbacks' );
Limit Posts on Your Blog Feed +
Whether your blog feed is set as your homepage or is another page of your site, you don’t need 50 thumbnails all loading at the same time. For those that run high-traffic blogs, your homepage is the most important page of your site, and you want this to load fast. The fewer requests and media the better in terms of performance.
Also, this is precisely why pagination was invented (as seen below). Pagination is what you see at the end of blog feeds that allow you to browse to the next page. Typically these are numbers, or they might use “next/previous” posts. Your WordPress theme will most likely already have customized pagination built-in.

Pagination
WordPress by default sets the limit on fresh WordPress installations to 10, but we’ve seen this changed so many times we’ve lost count. So make sure to double-check what value you’re using. We recommend somewhere between 8 and 12. If you’re curious, we are using 12 on our Kinsta blog homepage.
You can find this option in your WordPress admin dashboard under “Settings → Reading.” You can then change the value for “Blog pages show at most.”

WordPress limit blog feed
Unused Content Files +
Another place that’s going to need ongoing cleaning is your content:
- Posts
- Pages
- Media
- Comments
- Projects
- Categories
- Tags
- Products
When was the last time you looked through your content?

There may be old drafts you won’t ever publish. Or really old, outdated content that serves no purpose today. Comments, categories, and tags can get especially messy if you don’t keep an eye on them.
Users fall into this category as well. Go through your user list and make sure only the people who should have access to the site still do. The rest can be deleted.
Database +
Your site’s database is where all of your content and settings are stored. Over time, it will pick up a ton of trash in the form of:
- Post revisions
- Trashed posts/comments
- Etc.
While we’re on the subject of cleanup, your database could use some cleaning too.
Every time you install a new plugin or theme, add a new user, receive a new comment, and so on, your database logs it. And each of these files add up. To keep your web server from having to process each and every one of these, you should keep your files clean.
When you work on your scheduled plugin and theme cleanup, make some time for this as well. All you have to do is install a database cleanup plugin like WP-Optimize.

It will go through and clean out unused or unnecessary data while also optimizing the rest of your database for speed.
Optimize Database after Deleting Revisions By CAGE Web Design | Rolf van Gelder, Eindhoven, The Netherlands
wordpress.org/plugins/advanced-database-cleaner
wordpress.org/plugins/query-monitor
Query Monitor is the developer tools panel for WordPress. It enables debugging of database queries, PHP errors, hooks and actions, block editor blocks, enqueued scripts and stylesheets, HTTP API calls, and more.
It includes some advanced features such as debugging of Ajax calls, REST API calls, and user capability checks. It includes the ability to narrow down much of its output by plugin or theme, allowing you to quickly determine poorly performing plugins, themes, or functions.
Use the InnoDB MySQL Storage Engine
A lot of older sites are still using the MyISAM storage engine in their database. Over recent years, InnoDB has shown to perform better and be more reliable.
Here are a couple of advantages of InnoDB over MyISAM:
- InnoDB has row-level locking. MyISAM only has full table-level locking. This allows your queries to process faster.
- InnoDB has what is called referential integrity which involves supporting foreign keys (RDBMS) and relationship constraints, MyISAM does not (DMBS).
- InnoDB supports transactions, which means you can commit and roll back. MyISAM does not.
- InnoDB is more reliable as it uses transactional logs for auto recovery. MyISAM does not.
So now you might be wondering, are you running InnoDB or MyISAM? If you are running on a fairly new WordPress site chances are you are already using the InnoDB MySQL storage engine. But with older WordPress sites you might want to do a quick check. Some sites might even have mixed and matched MyISAM and InnoDB tables, in which you could see improvements by converting them all over.
Follow these simple steps below to check.
Step 1
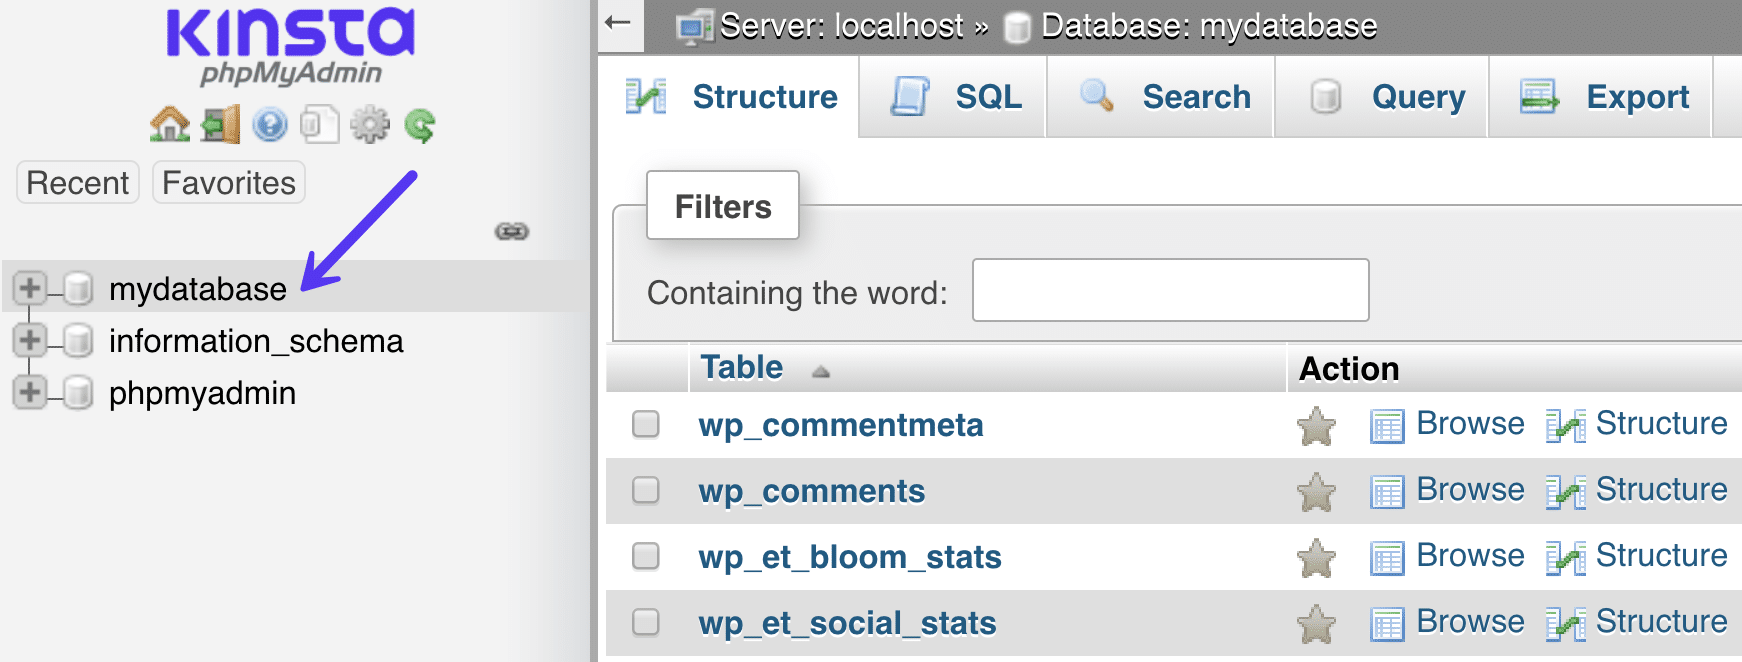
Login to phpMyAdmin and click on your MySQL database.
phpMyAdmin database
Step 2
Do a quick scan or sort of the “Type” column, and you can see which Storage Engine types your tables are using. In this example below, you can see that two of the tables are still using MyISAM.

MyISAM database tables
If you found some, then it’s probably time to move them to InnoDB. We always recommend reaching out to your host and asking if they can do this for you. At Kinsta, every client’s database tables automatically get converted to InnoDB by our migration team.
But you can always follow these tutorials below to convert your MyISAM tables to InnoDB manually:
Disable/Enable All WordPress Plugins via the Database
WordPress Plugins +
WordPress plugins are great because they help even the least tech-savvy user build advanced features into a website. But plugins suffer from similar performance issues as themes, which can make it tricky to use them.

Here’s what you need to do to confirm your plugins won’t hurt speed:
- Always check the reviews of any plugin you want to use. Again, if there are known performance issues, plenty of people will have chimed in already.
- See how many people have installed the plugin. If there are under 5,000 users, you might want to find a more established replacement. This doesn’t mean that newer plugins aren’t worth trying out. However, it’s a big risk to take if you don’t know how the plugin affects site performance.
- Only use the plugins you absolutely need. If any of them overlap in terms of functionality, get rid of one of them. The fewer plugins you have installed, the better.
There are also some plugins that tend to be a huge drain on websites because of how many external scripts they call (e.g. plugins for external analytics or social media have issues with this).
There are other times when a plugin will do the same exact thing that your web hosting does, which makes the plugin unnecessary.
So, see what your web host says if you’re on the fence about a plugin.
One Big Issue with WordPress Plugins
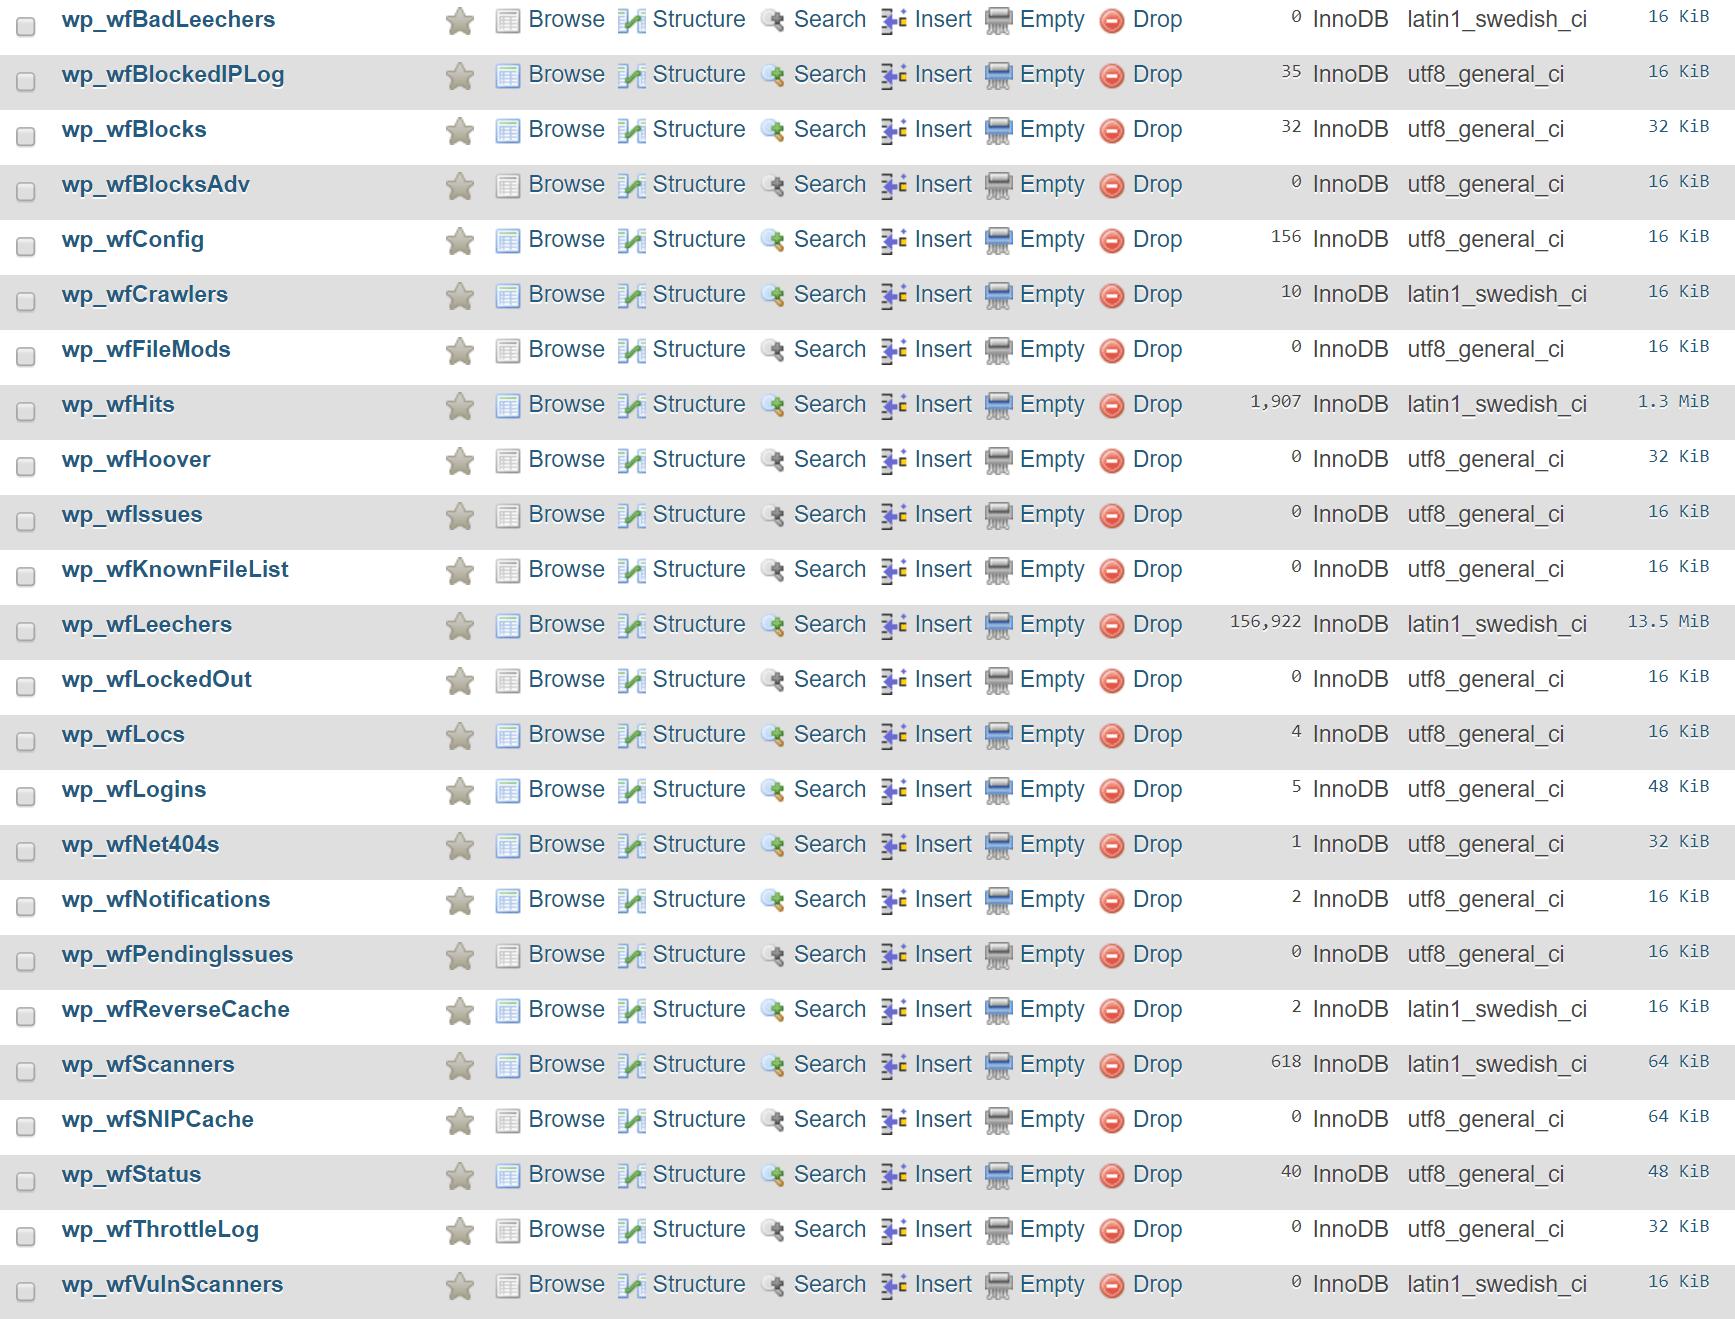
One big issue with WordPress plugins is the uninstall process. Whenever you install a WordPress plugin or theme, it stores the data in the database. The problem is that when you delete a plugin using one of the standard methods, it typically leaves behind tables and rows in your database. Over time this can add up to a lot of data and even begin to slow your site down. In our example, we uninstalled the Wordfence security plugin, and it left behind 24 tables in our database (as seen below). It’s even worse if they’re behind data in your wp_options table.
WordFence tables
And besides the database, a lot of plugins also leave behind additional folders and files. In our experience, this is commonly seen with security and caching plugins which create additional directories for logging. For example, after the Wordfence plugin was deleted, we were left with a “wflogs” folder in our wp-content directory. And we aren’t trying to pick on Wordfence, the majority of plugins and themes on the market work this way.
Check Your Error Logs +
You can also enable error logs by adding some code to your wp-config.php file. First, you will want to connect to your site via SFTP. Then download your wp-config.php so you can edit it. Note: Always make a backup of this file first!

Download wp-config.php file
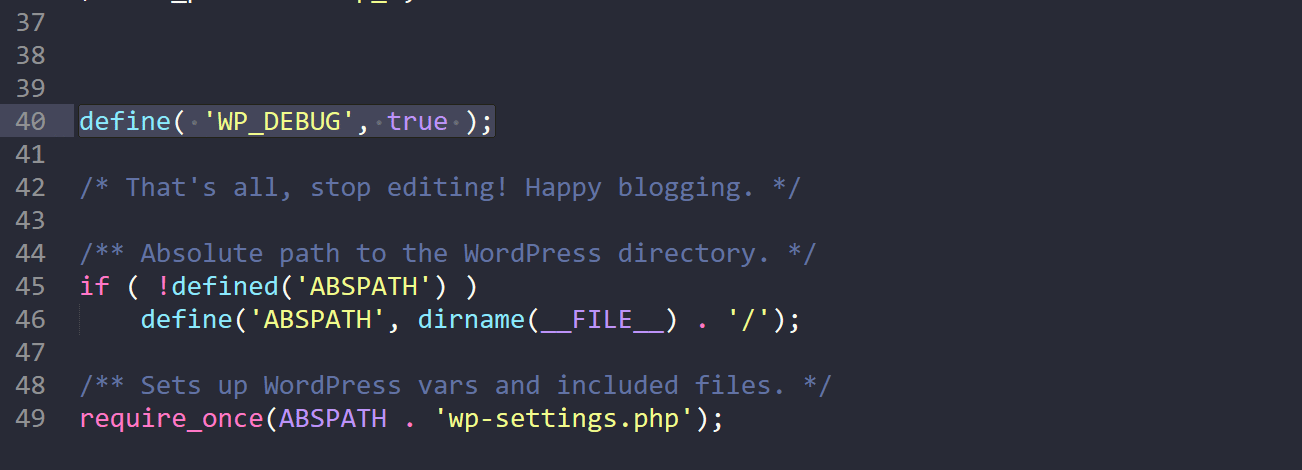
Find the line that says /* That's all, stop editing! Happy blogging. */ and just before it, add the following (as seen below):
define( 'WP_DEBUG', true );
WP_DEBUG
If the above code already exists in your wp-config.php file but is set to “false,” simply change it to “true.” This will enable debug mode. Note: You will also see warnings or error in your WordPress admin if they exist.
You can then enable the debug log to send all errors to a file by adding the following code just after the WP_DEBUG line (as seen below):
define( 'WP_DEBUG_LOG', true );
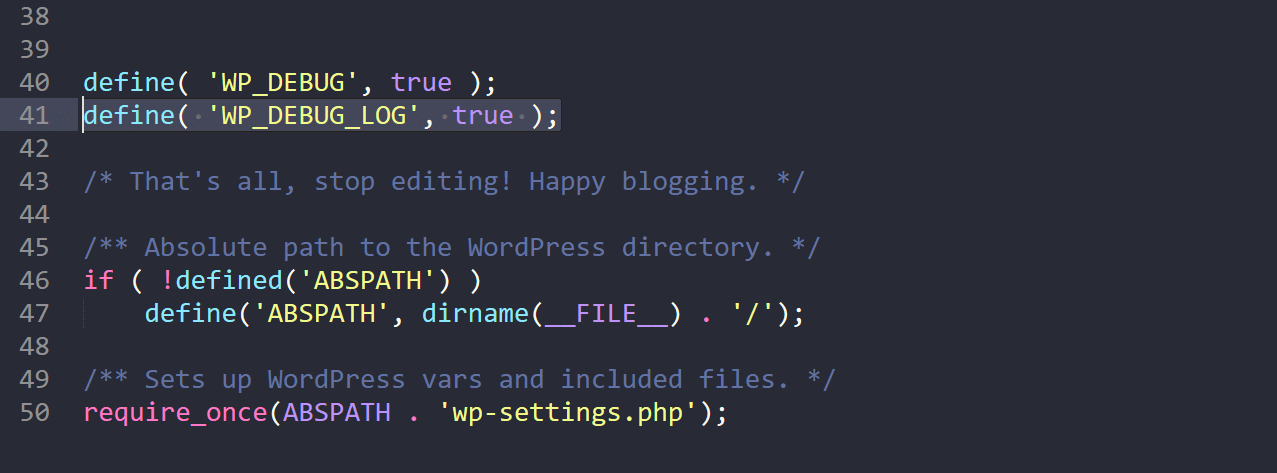
WP_DEBUG_LOG
Save your changes and re-upload this to your server. The errors will then get logged to the debug.log file within your /wp-content/ folder. If for some reason you don’t see this file, you can always create one.
Advance Level Optimization+
#: Add an Expires or a Cache-Control Header
tag: server
There are two aspects to this rule:
- For static components: implement "Never expire" policy by setting far future Expires header
- For dynamic components: use an appropriate Cache-Control header to help the browser with conditional requests
Web page designs are getting richer and richer, which means more scripts, stylesheets, images, and Flash in the page. A first-time visitor to your page may have to make several HTTP requests, but by using the Expires header you make those components cacheable. This avoids unnecessary HTTP requests on subsequent page views. Expires headers are most often used with images, but they should be used on all components including scripts, stylesheets, and Flash components.
Browsers (and proxies) use a cache to reduce the number and size of HTTP requests, making web pages load faster. A web server uses the Expires header in the HTTP response to tell the client how long a component can be cached. This is a far future Expires header, telling the browser that this response won't be stale until April 15, 2010.
Expires: Thu, 15 Apr 2010 20:00:00 GMT
If your server is Apache, use the ExpiresDefault directive to set an expiration date relative to the current date. This example of the ExpiresDefault directive sets the Expires date 10 years out from the time of the request.
ExpiresDefault "access plus 10 years"
Keep in mind, if you use a far future Expires header you have to change the component's filename whenever the component changes. At Yahoo! we often make this step part of the build process: a version number is embedded in the component's filename, for example, yahoo_2.0.6.js.
Using a far future Expires header affects page views only after a user has already visited your site. It has no effect on the number of HTTP requests when a user visits your site for the first time and the browser's cache is empty. Therefore the impact of this performance improvement depends on how often users hit your pages with a primed cache. (A "primed cache" already contains all of the components in the page.) We measured this at Yahoo! and found the number of page views with a primed cache is 75-85%. By using a far future Expires header, you increase the number of components that are cached by the browser and re-used on subsequent page views without sending a single byte over the user's Internet connection.
#: Put Stylesheets at the Top
tag: css
While researching performance at Yahoo!, we discovered that moving stylesheets to the document HEAD makes pages appear to be loading faster. This is because putting stylesheets in the HEAD allows the page to render progressively.
Front-end engineers that care about performance want a page to load progressively; that is, we want the browser to display whatever content it has as soon as possible. This is especially important for pages with a lot of content and for users on slower Internet connections. The importance of giving users visual feedback, such as progress indicators, has been well researched and documented. In our case the HTML page is the progress indicator! When the browser loads the page progressively the header, the navigation bar, the logo at the top, etc. all serve as visual feedback for the user who is waiting for the page. This improves the overall user experience.
The problem with putting stylesheets near the bottom of the document is that it prohibits progressive rendering in many browsers, including Internet Explorer. These browsers block rendering to avoid having to redraw elements of the page if their styles change. The user is stuck viewing a blank white page.
The HTML specification clearly states that stylesheets are to be included in the HEAD of the page: "Unlike A, [LINK] may only appear in the HEAD section of a document, although it may appear any number of times." Neither of the alternatives, the blank white screen or flash of unstyled content, are worth the risk. The optimal solution is to follow the HTML specification and load your stylesheets in the document HEAD.
#: Put Scripts at the Bottom
tag: javascript
The problem caused by scripts is that they block parallel downloads. The HTTP/1.1 specification suggests that browsers download no more than two components in parallel per hostname. If you serve your images from multiple hostnames, you can get more than two downloads to occur in parallel. While a script is downloading, however, the browser won't start any other downloads, even on different hostnames.
In some situations it's not easy to move scripts to the bottom. If, for example, the script uses document.write to insert part of the page's content, it can't be moved lower in the page. There might also be scoping issues. In many cases, there are ways to workaround these situations.
An alternative suggestion that often comes up is to use deferred scripts. The DEFER attribute indicates that the script does not contain document.write, and is a clue to browsers that they can continue rendering. Unfortunately, Firefox doesn't support the DEFER attribute. In Internet Explorer, the script may be deferred, but not as much as desired. If a script can be deferred, it can also be moved to the bottom of the page. That will make your web pages load faster.
#: Avoid CSS Expressions
tag: css
CSS expressions are a powerful (and dangerous) way to set CSS properties dynamically. They were supported in Internet Explorer starting with version 5, but were deprecated starting with IE8. As an example, the background color could be set to alternate every hour using CSS expressions:
background-color: expression( (new Date()).getHours()%2 ? "#B8D4FF" : "#F08A00" );
As shown here, the expression method accepts a JavaScript expression. The CSS property is set to the result of evaluating the JavaScript expression. The expression method is ignored by other browsers, so it is useful for setting properties in Internet Explorer needed to create a consistent experience across browsers.
The problem with expressions is that they are evaluated more frequently than most people expect. Not only are they evaluated when the page is rendered and resized, but also when the page is scrolled and even when the user moves the mouse over the page. Adding a counter to the CSS expression allows us to keep track of when and how often a CSS expression is evaluated. Moving the mouse around the page can easily generate more than 10,000 evaluations.
One way to reduce the number of times your CSS expression is evaluated is to use one-time expressions, where the first time the expression is evaluated it sets the style property to an explicit value, which replaces the CSS expression. If the style property must be set dynamically throughout the life of the page, using event handlers instead of CSS expressions is an alternative approach. If you must use CSS expressions, remember that they may be evaluated thousands of times and could affect the performance of your page.
#: Reduce DNS Lookups
tag: content
The Domain Name System (DNS) maps hostnames to IP addresses, just as phonebooks map people's names to their phone numbers. When you type www.yahoo.com into your browser, a DNS resolver contacted by the browser returns that server's IP address. DNS has a cost. It typically takes 20-120 milliseconds for DNS to lookup the IP address for a given hostname. The browser can't download anything from this hostname until the DNS lookup is completed.
DNS lookups are cached for better performance. This caching can occur on a special caching server, maintained by the user's ISP or local area network, but there is also caching that occurs on the individual user's computer. The DNS information remains in the operating system's DNS cache (the "DNS Client service" on Microsoft Windows). Most browsers have their own caches, separate from the operating system's cache. As long as the browser keeps a DNS record in its own cache, it doesn't bother the operating system with a request for the record.
Internet Explorer caches DNS lookups for 30 minutes by default, as specified by the DnsCacheTimeout registry setting. Firefox caches DNS lookups for 1 minute, controlled by the network.dnsCacheExpiration configuration setting. (Fasterfox changes this to 1 hour.)
When the client's DNS cache is empty (for both the browser and the operating system), the number of DNS lookups is equal to the number of unique hostnames in the web page. This includes the hostnames used in the page's URL, images, script files, stylesheets, Flash objects, etc. Reducing the number of unique hostnames reduces the number of DNS lookups.
Reducing the number of unique hostnames has the potential to reduce the amount of parallel downloading that takes place in the page. Avoiding DNS lookups cuts response times, but reducing parallel downloads may increase response times. My guideline is to split these components across at least two but no more than four hostnames. This results in a good compromise between reducing DNS lookups and allowing a high degree of parallel downloads.
#: Avoid Redirects
tag: content
Redirects are accomplished using the 301 and 302 status codes. Here's an example of the HTTP headers in a 301 response:
HTTP/1.1 301 Moved Permanently Location: http://example.com/newuri Content-Type: text/html
The browser automatically takes the user to the URL specified in the Location field. All the information necessary for a redirect is in the headers. The body of the response is typically empty. Despite their names, neither a 301 nor a 302 response is cached in practice unless additional headers, such as Expires or Cache-Control, indicate it should be. The meta refresh tag and JavaScript are other ways to direct users to a different URL, but if you must do a redirect, the preferred technique is to use the standard 3xx HTTP status codes, primarily to ensure the back button works correctly.
The main thing to remember is that redirects slow down the user experience. Inserting a redirect between the user and the HTML document delays everything in the page since nothing in the page can be rendered and no components can start being downloaded until the HTML document has arrived.
One of the most wasteful redirects happens frequently and web developers are generally not aware of it. It occurs when a trailing slash (/) is missing from a URL that should otherwise have one. For example, going to http://astrology.yahoo.com/astrology results in a 301 response containing a redirect to http://astrology.yahoo.com/astrology/ (notice the added trailing slash). This is fixed in Apache by using Alias or mod_rewrite, or the DirectorySlash directive if you're using Apache handlers.
Connecting an old web site to a new one is another common use for redirects. Others include connecting different parts of a website and directing the user based on certain conditions (type of browser, type of user account, etc.). Using a redirect to connect two web sites is simple and requires little additional coding. Although using redirects in these situations reduces the complexity for developers, it degrades the user experience. Alternatives for this use of redirects include using Alias and mod_rewrite if the two code paths are hosted on the same server. If a domain name change is the cause of using redirects, an alternative is to create a CNAME (a DNS record that creates an alias pointing from one domain name to another) in combination with Alias or mod_rewrite.
#: Remove Duplicate Scripts
tag: javascript
It hurts performance to include the same JavaScript file twice in one page. This isn't as unusual as you might think. A review of the ten top U.S. web sites shows that two of them contain a duplicated script. Two main factors increase the odds of a script being duplicated in a single web page: team size and number of scripts. When it does happen, duplicate scripts hurt performance by creating unnecessary HTTP requests and wasted JavaScript execution.
Unnecessary HTTP requests happen in Internet Explorer, but not in Firefox. In Internet Explorer, if an external script is included twice and is not cacheable, it generates two HTTP requests during page loading. Even if the script is cacheable, extra HTTP requests occur when the user reloads the page.
In addition to generating wasteful HTTP requests, time is wasted evaluating the script multiple times. This redundant JavaScript execution happens in both Firefox and Internet Explorer, regardless of whether the script is cacheable.
One way to avoid accidentally including the same script twice is to implement a script management module in your templating system. The typical way to include a script is to use the SCRIPT tag in your HTML page.
<script type="text/javascript" src="menu_1.0.17.js"></script>
An alternative in PHP would be to create a function called insertScript.
<?php insertScript("menu.js") ?>
In addition to preventing the same script from being inserted multiple times, this function could handle other issues with scripts, such as dependency checking and adding version numbers to script filenames to support far future Expires headers.
#: Configure ETags
tag: server
Entity tags (ETags) are a mechanism that web servers and browsers use to determine whether the component in the browser's cache matches the one on the origin server. (An "entity" is another word a "component": images, scripts, stylesheets, etc.) ETags were added to provide a mechanism for validating entities that is more flexible than the last-modified date. An ETag is a string that uniquely identifies a specific version of a component. The only format constraints are that the string be quoted. The origin server specifies the component's ETag using the ETag response header.
 HTTP/1.1 200 OK
  Last-Modified: Tue, 12 Dec 2006 03:03:59 GMT
  ETag: "10c24bc-4ab-457e1c1f"
  Content-Length: 12195
Later, if the browser has to validate a component, it uses the If-None-Match header to pass the ETag back to the origin server. If the ETags match, a 304 status code is returned reducing the response by 12195 bytes for this example.
GET /i/yahoo.gif HTTP/1.1
  Host: us.yimg.com
  If-Modified-Since: Tue, 12 Dec 2006 03:03:59 GMT
  If-None-Match: "10c24bc-4ab-457e1c1f"
  HTTP/1.1 304 Not Modified
The problem with ETags is that they typically are constructed using attributes that make them unique to a specific server hosting a site. ETags won't match when a browser gets the original component from one server and later tries to validate that component on a different server, a situation that is all too common on Web sites that use a cluster of servers to handle requests. By default, both Apache and IIS embed data in the ETag that dramatically reduces the odds of the validity test succeeding on web sites with multiple servers.
The ETag format for Apache 1.3 and 2.x is inode-size-timestamp. Although a given file may reside in the same directory across multiple servers, and have the same file size, permissions, timestamp, etc., its inode is different from one server to the next.
IIS 5.0 and 6.0 have a similar issue with ETags. The format for ETags on IIS is Filetimestamp:ChangeNumber. A ChangeNumber is a counter used to track configuration changes to IIS. It's unlikely that the ChangeNumber is the same across all IIS servers behind a web site.
The end result is ETags generated by Apache and IIS for the exact same component won't match from one server to another. If the ETags don't match, the user doesn't receive the small, fast 304 response that ETags were designed for; instead, they'll get a normal 200 response along with all the data for the component. If you host your web site on just one server, this isn't a problem. But if you have multiple servers hosting your web site, and you're using Apache or IIS with the default ETag configuration, your users are getting slower pages, your servers have a higher load, you're consuming greater bandwidth, and proxies aren't caching your content efficiently. Even if your components have a far future Expires header, a conditional GET request is still made whenever the user hits Reload or Refresh.
If you're not taking advantage of the flexible validation model that ETags provide, it's better to just remove the ETag altogether. The Last-Modified header validates based on the component's timestamp. And removing the ETag reduces the size of the HTTP headers in both the response and subsequent requests. This Microsoft Support article describes how to remove ETags. In Apache, this is done by simply adding the following line to your Apache configuration file:
FileETag none
#: Make Ajax Cacheable
tag: content
One of the cited benefits of Ajax is that it provides instantaneous feedback to the user because it requests information asynchronously from the backend web server. However, using Ajax is no guarantee that the user won't be twiddling his thumbs waiting for those asynchronous JavaScript and XML responses to return. In many applications, whether or not the user is kept waiting depends on how Ajax is used. For example, in a web-based email client the user will be kept waiting for the results of an Ajax request to find all the email messages that match their search criteria. It's important to remember that "asynchronous" does not imply "instantaneous".
To improve performance, it's important to optimize these Ajax responses. The most important way to improve the performance of Ajax is to make the responses cacheable, as discussed in Add an Expires or a Cache-Control Header. Some of the other rules also apply to Ajax:
Let's look at an example. A Web 2.0 email client might use Ajax to download the user's address book for autocompletion. If the user hasn't modified her address book since the last time she used the email web app, the previous address book response could be read from cache if that Ajax response was made cacheable with a future Expires or Cache-Control header. The browser must be informed when to use a previously cached address book response versus requesting a new one. This could be done by adding a timestamp to the address book Ajax URL indicating the last time the user modified her address book, for example, &t=1190241612. If the address book hasn't been modified since the last download, the timestamp will be the same and the address book will be read from the browser's cache eliminating an extra HTTP roundtrip. If the user has modified her address book, the timestamp ensures the new URL doesn't match the cached response, and the browser will request the updated address book entries.
Even though your Ajax responses are created dynamically, and might only be applicable to a single user, they can still be cached. Doing so will make your Web 2.0 apps faster.
#: Flush the Buffer Early
tag: server
When users request a page, it can take anywhere from 200 to 500ms for the backend server to stitch together the HTML page. During this time, the browser is idle as it waits for the data to arrive. In PHP you have the function flush(). It allows you to send your partially ready HTML response to the browser so that the browser can start fetching components while your backend is busy with the rest of the HTML page. The benefit is mainly seen on busy backends or light frontends.
A good place to consider flushing is right after the HEAD because the HTML for the head is usually easier to produce and it allows you to include any CSS and JavaScript files for the browser to start fetching in parallel while the backend is still processing.
Example:
... <!-- css, js -->
  </head>
  <?php flush(); ?>
  <body>
  ... <!-- content -->
Yahoo! search pioneered research and real user testing to prove the benefits of using this technique.
#: Make favicon.ico Small and Cacheable
tag: images
The favicon.ico is an image that stays in the root of your server. It's a necessary evil because even if you don't care about it the browser will still request it, so it's better not to respond with a 404 Not Found. Also since it's on the same server, cookies are sent every time it's requested. This image also interferes with the download sequence, for example in IE when you request extra components in the onload, the favicon will be downloaded before these extra components.
So to mitigate the drawbacks of having a favicon.ico make sure:
- It's small, preferably under 1K.
- Set Expires header with what you feel comfortable (since you cannot rename it if you decide to change it). You can probably safely set the Expires header a few months in the future. You can check the last modified date of your current favicon.ico to make an informed decision.
Imagemagick can help you create small favicons
#: Don't Scale Images in HTML
tag: images
Don't use a bigger image than you need just because you can set the width and height in HTML. If you need
<img width="100" height="100" src="mycat.jpg" alt="My Cat" />
then your image (mycat.jpg) should be 100x100px rather than a scaled down 500x500px image.
#: Choose <link> over @import
tag: css
One of the previous best practices states that CSS should be at the top in order to allow for progressive rendering.
In IE @import behaves the same as using <link> at the bottom of the page, so it's best not to use it.
#: Develop Smart Event Handlers
tag: javascript
Sometimes pages feel less responsive because of too many event handlers attached to different elements of the DOM tree which are then executed too often. That's why using event delegation is a good approach. If you have 10 buttons inside a div, attach only one event handler to the div wrapper, instead of one handler for each button. Events bubble up so you'll be able to catch the event and figure out which button it originated from.
You also don't need to wait for the onload event in order to start doing something with the DOM tree. Often all you need is the element you want to access to be available in the tree. You don't have to wait for all images to be downloaded. DOMContentLoaded is the event you might consider using instead of onload, but until it's available in all browsers, you can use the YUI Event utility, which has an onAvailable method.
For more information check the YUI theatre's "High Performance Ajax Applications" by Julien Lecomte.
#: Minimize DOM Access
tag: javascript
Accessing DOM elements with JavaScript is slow so in order to have a more responsive page, you should:
- Cache references to accessed elements
- Update nodes "offline" and then add them to the tree
- Avoid fixing layout with JavaScript
For more information check the YUI theatre's "High Performance Ajax Applications" by Julien Lecomte.
#: Reduce the Number of DOM Elements
tag: content
A complex page means more bytes to download and it also means slower DOM access in JavaScript. It makes a difference if you loop through 500 or 5000 DOM elements on the page when you want to add an event handler for example.
A high number of DOM elements can be a symptom that there's something that should be improved with the markup of the page without necessarily removing content. Are you using nested tables for layout purposes? Are you throwing in more <div>s only to fix layout issues? Maybe there's a better and more semantically correct way to do your markup.
A great help with layouts are the YUI CSS utilities: grids.css can help you with the overall layout, fonts.css and reset.css can help you strip away the browser's defaults formatting. This is a chance to start fresh and think about your markup, for example use <div>s only when it makes sense semantically, and not because it renders a new line.
The number of DOM elements is easy to test, just type in Firebug's console:
document.getElementsByTagName('*').length
And how many DOM elements are too many? Check other similar pages that have good markup. For example the Yahoo! Home Page is a pretty busy page and still under 700 elements (HTML tags).
How to Avoid Excessive DOM Size in WordPress
by Gijo Varghese November 25, 2019
#: The use of tracking software has a significant compounding effect on website performance.
#: Third Party Services Slow Website Performance
#: Premium DNS is Better Than Free DNS
Free VS Premium DNS - namecheap.com
#:
WP Optimization Articles by Wordpress Officials+
WP Optimization Tips & Articles +
docs.elementor.com/article/286-speed-up-a-slow-site
elementor.com/blog/speed-up-wordpress-website
How to Improve Your YSlow Score
An article by keyCDN
web.dev/vitals/
How to Speed up Your WordPress Site (Ultimate 2019 Guide)- kinsta.com
How to Leverage Browser Caching in WordPress With or Without a Plugin [5 ways]
Leverage browser caching for 3rd party JS
How We Boosted Page Speed By 58% ..and how you can too! - 17 Jan 2018
downtimemonkey.com/blog/how-we-boosted-page-load-speed.php
WP Optimization Video Tuts +
Speed Up WordPress in 2019: How To Optimize Your Website & Make It Load Fast
Video Tuts by Oxygen - Feb 27, 2019
WordPress Speed Optimization - How I Got 100% GTmetrix Scores (2019 Updated)
Video Tuts by Online Media Masters - Aug 8, 2019
Best way to speed up WordPress site for free : Optimize & make your website super fast
Video Tuts by Growbig - Aug 17, 2019
How to speed up Wordpress On Godaddy Cpanel Hosting
Video Tuts by Brendan Skousen - Apr 30, 2015
